Spring MVC化
换句话说,软件应该能够同时应对多个不同国家和地区用户的访问,并根据用户地区和语言习惯,提供相应的、符用具阅读习惯的页面和数据。例如,为中国用户提供汉语界面显示,为美国用户提供提供英语界面显示。
本节我们以 Thymemeaf 为例,演示下如何在 Spring MVC 项目中实现化。
在 Spring 项目中实现化,通常需要以下 4 步:
Spring MVC 配置文件进行配置;
编写化资源(配置)文件;
在页面中获取化内容;
编写控制器方法手动切换语言。
1. 配置 Spring MVC 的配置文件
想要在 Spring MVC 中实现化,我们需要在 Spring MVC 的配置文件中配置以下内容:
<bean id="messageSource" class="org.springframework.context.support.ResourceBundleMessageSource">
<property name="basenames" value="messages"></property>
<property name="defaultEncoding" value="UTF-8"></property>
<property name="cacheSeconds" value="0"></property>
</bean>
<bean id="localeResolver" class="org.springframework.web.servlet.i18n.SessionLocaleResolver">
<property name="defaultLocale" value="en_US"/>
</bean>
<mvc:interceptors>
<bean class="org.springframework.web.servlet.i18n.LocaleChangeInterceptor">
<property name="paramName" value="lang"></property>
</bean>
</mvc:interceptors>
以上个配置说明如下:
ResourceBundleMessageSource:对资源文件中设置的内容进行绑定;
LocaleChangeInterceptor:用于获取请求中的化信息并将其转换为 Locale 对象,以获取 LocaleResolver 对象对化资源文件进行解析。
SessionLocaleResolver:将将包含了化信息的 Locale 对象存储在 Session 中,供后续页面继续使用。
2. 编写化资源文件
在 Spring MVC 工程的类路径下创建化资源文件,文件名格式为:基本名_语言代码_国家或地区代码,例如 messages_en_US.properties、messages_zh_CN.properties。在化资源文件中,我们需要对不同语言环境下需要进行化的各个字段进行配置,示例代码如下。
messages_en_US.properties 代码如下:
userName=userName
password=password
messages_zh_CN.properties 代码如下:
userName=用户名
password=密码
需要注意的是,这化资源文件名称必须严格按照其名格式进行名,否则解析时会出错。其次,化资源文件在创建完成后,这些文件通常会自动归档(Resouce Bundle),而该目录并非我们手动创建,如下所示。
- resources
- Resouce Bundle 'messages'
- messages_en_US.properties
- messages_zh_CN.properties
3. 在页面中获取化内容
在完成以上配置后,我们只要在 Thymeleaf 代码中获取指定的字段即可,示例代码如下。<h2 th:text="#{userName}"></h2>
<h2 th:text="#{password}"></h2>
4. 手动切换语言环境
我们可以在控制器类中编写一个控制器方法,手动切化的语言环境。1) 在前端页面中添加切换语言环境的超链接,示例代码如下。
<a th:href="@{/localeChange(lang=en_US)}">英文</a>
<a th:href="@{/localeChange(lang=zh_CN)}">中文</a>
2) 在控制器类中添加一个切换或计划语言环境的控制器方法,示例代码如下。
@Controller
public class TestController {
@Resource
private ResourceBundleMessageSource messageSource;
//切换语言环境
@RequestMapping("/localeChange")
public String localeChange(Locale locale) {
String userName = messageSource.getMessage("userName", null, locale);
String password = messageSource.getMessage("password", null, locale);
System.out.println(userName + "----" + password);
return "user";
}
}
当我们想要手动切换语言环境时,只需要点击相应的超链接即可,此时浏览会发送一个 “/localeChange?lang=***”的请求。该请求会被我们在 Spring MVC 配置文件中配置的 LocaleChangeInterceptor 拦截,并将指定的请求参数(lang)的值转换为 Locale 对象,以获取 LocaleResolver 对象对指定的化资源文件进行解析,最终实现切换化语言环境的目的。
示例
下面,我们通过一个简单的实例,完整地演示下 Spring MVC+Thymeleaf 实现化的过程。1. 新建一个名为 springmvc-I18n-demo 的 Web 工程,并将 Spring MVC 相关的依赖引入到工程中,web.xml 配置内容如下。
<?xml version="1.0" encoding="UTF-8"?>
<web-app xmlns="http://xmlns.jcp网站站点" rel="nofollow" />
<?xml version="1.0" encoding="UTF-8"?>
<beans xmlns="http://www.springframework网站站点" rel="nofollow" />
package net.biancheng.c.entity;
public class User {
private String userName;
private String password;
public String getUserName() {
return userName;
}
public void setUserName(String userName) {
this.userName = userName;
}
public String getPassword() {
return password;
}
public void setPassword(String password) {
this.password = password;
}
@Override
public String toString() {
return "User{" +
"userName='" + userName + '\'' +
", password='" + password + '\'' +
'}';
}
}
4. 在 net.biancheng.c.controller 包下,创建一个名为 I18nController 的控制器类,代码如下。
package net.biancheng.c.controller;
import org.springframework.context.support.ResourceBundleMessageSource;
import org.springframework.stereotype.Controller;
import org.springframework.web.bind.annotation.RequestMapping;
import javax.annotation.Resource;
import java.util.Locale;
@Controller
public class I18nController {
@Resource
private ResourceBundleMessageSource messageSource;
//切换语言环境
@RequestMapping("/localeChange")
public String localeChange(Locale locale) {
String userName = messageSource.getMessage("userName", null, locale);
String password = messageSource.getMessage("password", null, locale);
String submit = messageSource.getMessage("submit", null, locale);
String reset = messageSource.getMessage("reset", null, locale);
String error = messageSource.getMessage("error", null, locale);
System.out.println(userName + "----" + password + "----" + submit + "----" + reset + "----" + error);
return "/login";
}
}
5. 在 net.biancheng.c.controller 包下,创建一个名为 LoginController 的控制器类,代码如下。
package net.biancheng.c.controller;
import net.biancheng.c.entity.User;
import org.springframework.stereotype.Controller;
import org.springframework.web.bind.annotation.RequestMapping;
import org.springframework.web.bind.annotation.RequestMethod;
import javax.servlet.http.HttpServletRequest;
import javax.servlet.http.HttpSession;
@Controller
public class LoginController {
@RequestMapping(value = "/login", method = RequestMethod.POST)
public String login(User user, HttpServletRequest request) {
if ("admin".equals(user.getUserName()) && "admin".equals(user.getPassword())) {
HttpSession session = request.getSession();
session.setAttribute("loginUser", user);
return "redirect:/success";
}
request.setAttribute("msg", "error");
return "login";
}
}
6. 在类目录下,新建两个化资源文件:messages_en_US.properties 和 messages_zh_CN.properties,内容如下。
messages_en_US.properties 配置内容如下:
userName=userName
password=password
submit=submit
reset=reset
error=wrong user name or password!
welcome=Welcome
messages_zh_CN.properties 配置内容如下:
userName=用户名
password=密码
submit=提交
reset=重置
error=用户名或密码错误!
welcome=欢迎您
7. 在 webapp/WEB-INF 下新建一个名为 templates 目录,并在该目录下创建一个名为 login.html 的登录页,代码如下。
<!DOCTYPE html>
<html lang="en" xmlns:th="http://www.thymeleaf网站站点" rel="nofollow" />
<!DOCTYPE html>
<html lang="en" xmlns:th="http://www.thymeleaf网站站点" rel="nofollow" />
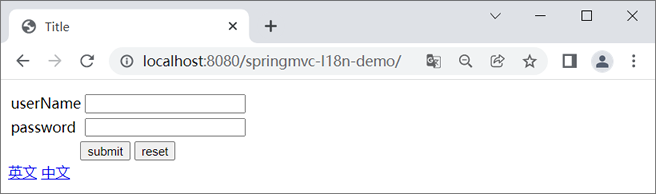
图1:登录页-英文
10. 分别输入错误的 userName 和 password ,如下图。
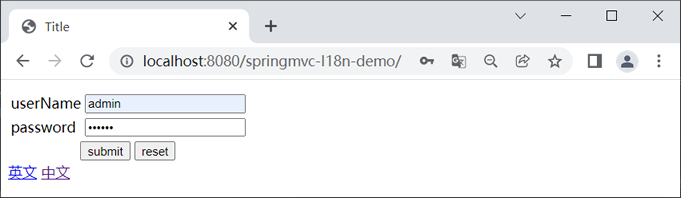
图2:账号密码-英文
11. 点击下方的“submit”按钮,结果如下图。
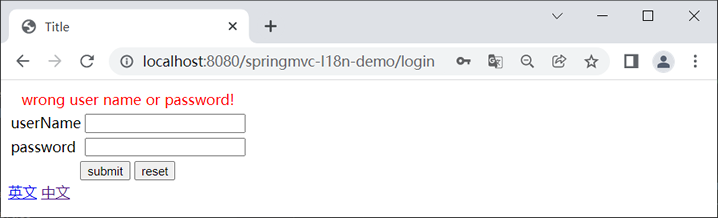
图3:错误提示-英文
12. 在登录页输入正确的用户名(admin)和密码(admin),点击下方的“submit”按钮跳转到“登陆成功页”,如下图。
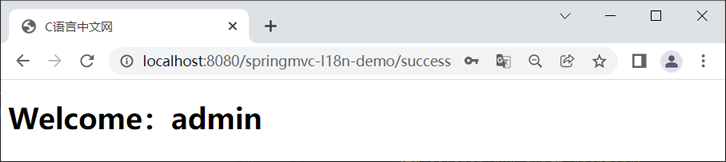
图4:登陆成功页-英文
13. 返回登录页,点击下方的“中文”将语言环境切换为中文,结果如下图。
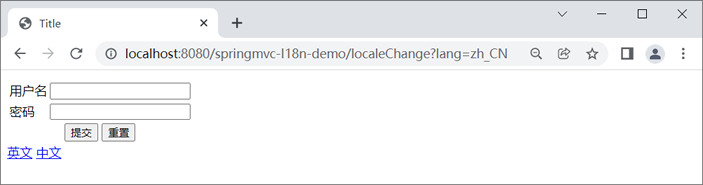
图5:登录页-中文
14. 再次在登录页输入错误的用户名和密码,结果如下图。

图6:错误提示-中文
13. 在登录页分别输入用户名(admin)和密码(admin),点击下方的“提交”按钮,结果如下图。
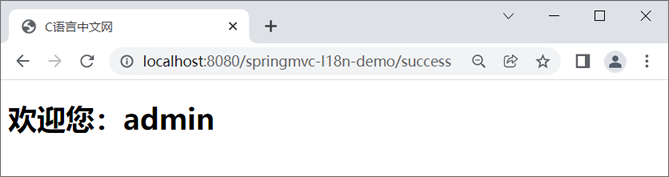
图6:登陆成功-中文